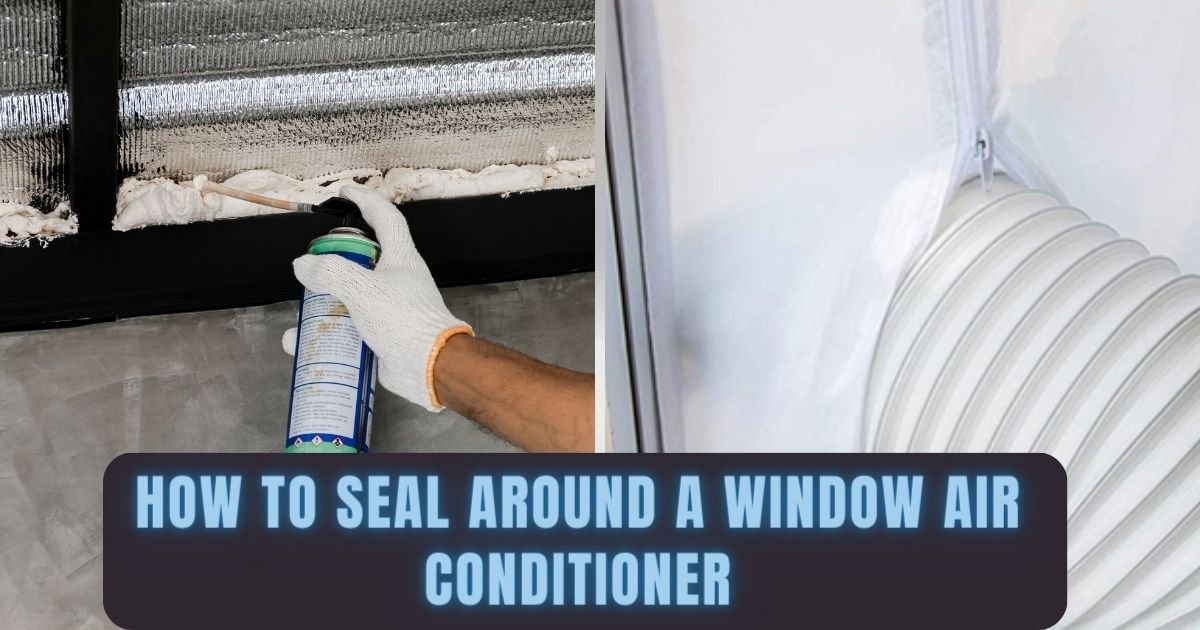
How To Seal Around A Window Air Conditioner For Improved Efficiency
To seal around a window air conditioner, you can take the following steps:
- Clean the window area and remove any debris.
- Install foam weatherstripping along the edges of the window.
- Apply caulk or sealant around the window frame.
- Use a window AC insulation kit to cover any gaps.
- Ensure a tight fit and proper insulation to prevent air leakage and improve efficiency.
Do you often find yourself cranking up the AC during the scorching summer months, only to have a pesky draft spoil your cool oasis? Or perhaps you dread opening your energy bill, knowing that your inefficient window air conditioner is sucking up precious energy and costing you a small fortune. If these scenarios sound all too familiar, then you’ve come to the right place.
Sealing around a window air conditioner may seem like a small task, but its impact can be significant. It not only prevents air leaks and drafts, but it also enhances the energy efficiency of your cooling system, leading to lower energy bills and a more comfortable living space.
Moreover, proper sealing can protect your home from potential water damage caused by condensation buildup. In this comprehensive guide, we will walk you through the steps to effectively seal around your window air conditioner. Whether you’re a homeowner looking to improve energy efficiency or a renter seeking cost-effective solutions, our easy-to-follow instructions and practical tips will equip you with the knowledge and skills to tackle this DIY home repair project.
Throughout the article, we will explore the common challenges faced by window air conditioner users, such as air leaks, drafts, high energy bills, and water damage. By the end, you’ll have the confidence to seal your window air conditioner like a pro, ensuring a comfortable and energy-efficient living space. So, let’s dive in and unlock the secrets to sealing around a window air conditioner, saving you money and keeping you cool all summer long.
Understanding the Importance of Sealing Around a Window Air Conditioner
Before we dive into the step-by-step process of sealing around a window air conditioner, let’s take a moment to understand why this task is so crucial. By sealing the gaps and cracks around your unit, you can experience a host of benefits that will enhance both your comfort and your wallet.

Preventing Air Leaks and Drafts
One of the primary reasons for sealing around a window air conditioner is to prevent air leaks and drafts. Over time, small gaps and cracks can develop around the unit, allowing outside air to seep in and conditioned air to escape. This leads to an inefficient cooling process, as your air conditioner has to work harder to maintain the desired temperature.
By effectively sealing these gaps, you create an airtight barrier that keeps the cool air inside your home and the hot air outside. This not only reduces energy waste but also ensures that your air conditioner operates at its optimal capacity, providing you with an even and comfortable indoor environment.
Improving Energy Efficiency
Air leaks and drafts can significantly impact the energy efficiency of your window air conditioner. When conditioned air escapes through gaps around the unit, your air conditioner has to compensate by running longer and working harder, leading to increased energy consumption.
By sealing around your window air conditioner, you create a tight seal that prevents air from escaping, allowing your air conditioner to operate efficiently. This, in turn, reduces your energy usage and lowers your monthly utility bills.
Reducing Energy Costs
By improving the energy efficiency of your window air conditioner, you can significantly reduce your energy costs. According to the U.S. Department of Energy, air conditioning accounts for approximately 6% of all electricity consumption in the United States.
Sealing around your window air conditioner allows you to optimize its performance, reducing the amount of energy required to cool your space. This can result in substantial savings on your monthly electricity bill, especially during the hot summer months when your air conditioner is running constantly.
Minimizing Water Damage
Condensation buildup is a common issue with window air conditioners, especially in humid climates. When warm, moist air from inside your home comes into contact with the cold surfaces of the unit, it condenses into water droplets.
If not properly addressed, this water buildup can lead to water damage, including mold growth and rotting of the surrounding window frame. Sealing around your window air conditioner helps to minimize condensation and redirect any water away from your home, protecting it from potential damage.
Creating a More Comfortable Living Space
By effectively sealing around your window air conditioner, you can create a more comfortable living space. A tight seal prevents drafts, drastically reducing the amount of outside noise, dust, and pollutants that enter your home.
Additionally, sealing around your unit helps to maintain a consistent indoor temperature, eliminating hot and cold spots in your home. This ensures that every room receives adequate cooling, providing you with a comfortable and enjoyable environment.
Step-by-Step Guide to Sealing Around a Window Air Conditioner
Now that you understand the benefits of sealing around a window air conditioner, let’s walk through the step-by-step process of completing this DIY home repair project. With the right tools and a little bit of time, you can seal your window air conditioner like a pro.
Step 1: Gather Your Tools and Materials
- PRECISION CAULKING WITH DRIP-FREE TECHNOLOGY: The Octogun 930-GTD Caulking Gun by Newborn offers advanced drip-free technology, providing smooth, mess-free caulking every time. With a 10:1 thrust ratio, this caulking gun delivers precise control over caulk flow. Ideal for sealing joints, cracks, and gaps, this caulk gun ensures clean, accurate applications in every use.
- EXTRA TOOLS INCLUDED FOR VERSATILITY: The Octogun 930-GTD comes with a range of built-in tools to streamline your caulking projects. Use the attached scraper tool to remove old material and for easy surface preparation, the 4-sided finishing square to make your caulk bead look professional, the spout cutter for efficient cartridge opening, and the seal puncture tool to get your caulking started right away.
- HEX ROD FOR EFFORTLESS CAULKING: The Octogun caulking gun features a hex rod for greater durability and smoother caulk dispensing. This design minimizes the effort needed for caulking, allowing users to apply sealants, adhesives, and caulk efficiently and with greater ease. The hex rod also ensures that the gun operates quietly, making it a preferred tool for both indoor and outdoor caulking tasks.
- COMPATIBLE WITH STANDARD 1/10 GALLON CARTRIDGES: Designed to work with any 1/10 gallon caulk cartridge, this caulk gun is ideal for use with thin materials such as latex and silicones. The 930-GTD offers versatility and ease of use for all your caulking needs. This item provides professional-grade results. Perfect for use in construction, renovation, and home improvement projects.
- Leikius caulk gun kit, a premium set designed for professionals and DIY user. Each caulking tool in our kit is crafted with precision, ensuring that you receive a product that performs optimally and lasts for years.Trust the Leikius for high-quality caulking tools that make your projects easier and more efficient
- Designed for professional and DIY use,Leikius caulk gun kit offers a seamless experience in applying silicone caulk,and the ergonomic handle ensures comfortable grip and reduced hand fatigue during prolonged use
- The teeth rod of mechanism with no-drip technology prevents dripping by releasing the trigger,easily control the flow of materials
- Gifts of updated sealant finishing tools and grout scraper are perfect for achieving a professional-looking finish on kitchen, bathroom sink joints, repair the gap and clean residual glue,improve the agglutination quality and the aesthetic sense of surface
- The all-in-one design, complete with a gift box, makes it an ideal gift for friends and relatives. Suitable for use with 10OZ tubes, this kit is a must-have for anyone about DIY home repairs
- 【Comfortable Grip】 Lightweight design with a rotating barrel reaches tight corner. Ergonomic grip reduces fatigue during grout removal or caulking projects, creating smooth silicone caulk lines
- 【Convinent & Hassle-free】 Attached dried caulk remover needle and spout cutter can open the caulking tube and clear clogged adhesive easily after caulk removal tool. Drip-free design keeps the site spotless—no leaks or spills
- 【Professional Sealant Tool】 Intergrated 5 functions in 1, this caulking tool with muti-angle finishing tool meets most of the caulking needs. Stainless steel caulk scraper handles toughest grout removal jobs
- 【Whole-Home Versatility】 It’s suitable for almost critical sealing zones, e.g., kitchen sink caulking, washroom, toilet, window/door,bathtub caulk, making your house look as good as new
- 【Ultimate Value Bundle】 From simple caulk removal to full sealant caulking projects, this silicone gun with that silicone tool does it all. Achieve durable seals as easily as possible
- Compact Convenience – Seal up windows, trim, tile, and more with your innovative no drip caulk gun from SILIGUN. Lay a uniform bead of latex, silicone, or polyurethane sealant with clean application.
- Truly Unique – Make the job simple with your patented sealant gun. There’s no push rod sticking out of the back. Store it easily and get into tight spaces without bumping or scratching walls.
- Modern Mechanism – Load a 10 oz. tube or 310ml sausage pack. A special contracting collar feeds the sealant through at a 12:1 push ratio. Trim away empty tubing to make your small caulking gun even smaller.
- Hang Tough – Count on your anti drip caulking gun to last. Strong yet lightweight ABS plastic stands up to abuse and is easy to hold for long periods. Hang it up for storage with a built-in hook.
- Not Suitable for Paper or Aluminum Tubes – Works best with Standard 10oz Plastic Tubes.
- 100% Silicone Caulk Protection: This silicone caulk white provides ultimate waterproof protection, ensuring a reliable seal against water damage. Ideal for areas with consistent exposure, keeping your surfaces safeguarded and pristine under any weather condition.
- Strong and Flexible: Delivers a silicone sealant waterproof white that remains permanently flexible, adapting to surface movements for a lasting, durable hold. Perfect for dynamic environments like bathrooms and kitchens where adaptability and resilience are paramount.
- Quick 30 Minute Water Ready Performance: Experience the convenience of a silicone caulk that becomes water resistant in just 30 minutes, making it perfect for time sensitive projects. No more waiting hours, dependable, quick sealing efficiency with white silicone caulk.
- Shrink and Crack Proof: Experience superior durability with white silicone caulk that withstands temperature fluctuations. Its flexibility guarantees your surfaces stay intact without shrinking or cracking, ensuring consistent protection and a flawless finish over time.
- Low Odor and Safe Indoors: Enjoy stress free application with this silicone sealant featuring a low odor, neutral cure formula. Great for indoor use without overwhelming fumes, enhancing comfort and safety while ensuring effective waterproof clear protection for your spaces.
- 100% Waterproof and Weatherproof: This 100% silicone formula offers protection from water damage, providing a reliable seal in areas exposed to harsh weather
- Excellent Flexibility and Strong Adhesion: Provides a flexible, durable seal for both exterior and interior projects
- Same-Day Rain-Ready: Ready for rain exposure in as little as 12 hours
- Compatible with Most Materials: Adheres to most metals and woods; glass, drywall, plaster, granite, cultured marble, ceramic and porcelain tile; natural stone, cement board, composites, and more
- Color : Clear
- 100% Silicone Caulk Protection: This silicone caulk white provides ultimate waterproof protection, ensuring a reliable seal against water damage. Ideal for areas with consistent exposure, keeping your surfaces safeguarded and pristine under any weather condition.
- Strong and Flexible: Delivers a silicone sealant waterproof white that remains permanently flexible, adapting to surface movements for a lasting, durable hold. Perfect for dynamic environments like bathrooms and kitchens where adaptability and resilience are paramount.
- Quick 30 Minute Water Ready Performance: Experience the convenience of a silicone caulk that becomes water resistant in just 30 minutes, making it perfect for time sensitive projects. No more waiting hours, dependable, quick sealing efficiency with white silicone caulk.
- Shrink and Crack Proof: Experience superior durability with white silicone caulk that withstands temperature fluctuations. Its flexibility guarantees your surfaces stay intact without shrinking or cracking, ensuring consistent protection and a flawless finish over time.
- Low Odor and Safe Indoors: Enjoy stress free application with this silicone sealant featuring a low odor, neutral cure formula. Great for indoor use without overwhelming fumes, enhancing comfort and safety while ensuring effective waterproof clear protection for your spaces.
- Indoor/Outdoor 100% Waterproof Caulk – Durable, long-lasting white silicone sealant for indoor and outdoor use; ideal for showers, sinks, windows, doors, gutters, and vents
- 30-Minute Water-Ready – Fast-curing caulk formula allows water exposure in just 30 minutes, perfect for quick home repairs and DIY projects
- Mold & Mildew Resistant – Protects surfaces from mold and mildew growth; easy to maintain with regular cleaning for lasting performance
- Highly Flexible & Durable – Meets ASTM C-920, Class 35 standards; won’t shrink, crack, or break down over time
- Clean Finish & Long-Lasting Performance – Maintains a professional look without yellowing; formulated for long-term results
- Seals out water, air, and moisture: Gorilla waterproof sealant provides a flexible rubberized coating that seals out water, air, and moisture to stop and prevent leaks
- Easy to use: The applicator nozzle’s controlled spray pattern provides a clean even coat; Once applied, our self leveling sealant smoothly covers small gaps and cracks ensuring a watertight seal
- Temperature and UV resistant: When dried, the rubberized coating of this Gorilla Glue spray is temperature and UV resistant, resulting in clear Gorilla Tough repairs
- Paintable: Our sealant works with both latex and oil based paints; When coating with oil based paints, use a primer before painting
- Use for: roofs, gutters, skylights, flashing, chimneys**, PVC pipe joints, window sealant, RV roof sealant, DIY projects and more
- 1. PROFESSIONAL-GRADE PERFORMANCE: Trust the adhesive that delivers a permanent, watertight bond for fiberglass, gelcoat, and wood. Perfect for sealing boat hardware and joints, it creates a superior barrier that is fully waterproof, weather-resistant, and UV-stable.
- 2. PERMANENT YETHER FLEXIBLE HOLD: This marine adhesive forms an incredibly strong, durable bond that retains just enough flexibility to withstand vibration, shock, and movement. Ideal for deck fittings, through-hulls, railings, and transducers.
- 3. FAST CURE—ABOVE & BELOW THE WATERLINE Get back on the water faster! Our 5200 FC formula cures in just 24 hours and performs reliably both above and below the waterline. Compare to other leading 5200 Fast Cure sealants.
- 4. BUILT TO LAST IN SUN AND SALT WATER Engineered for long-term durability, our sealant resists degradation from sun and UV exposure. It stands up to harsh marine environments, whether in fresh or saltwater, season after season.
- 5. EASY TO APPLY, READY TO USE No mixing required! This single-component, solvent-free sealant is low odor, non-toxic, and applies smoothly straight from the tube. It won’t crack or peel, ensuring a clean, lasting finish.
- Premium Metal Roof Sealant: Elastomeric polymer formula provides strong adhesion to aluminum, copper, galvanized steel, Kynar coated metals, and most building materials.
- Flexible & Weather-Tight: Permanently flexible with ±50% joint movement, zero shrinkage, and resistant to dust, dirt, water, and wind.
- Outperforms Other Sealants: Exceeds the performance of silicone, tripolymer, and urethane sealants for long-lasting exterior protection.
- Extreme Weather Application: Extrudable in hot or cold conditions, adheres to wet and damp surfaces, UV-resistant, and compatible with all types of foam.
- Ideal for Exterior Projects: Perfect for sealing metal roofs, windows, doors, siding, gutters, and vents; VOC-compliant and solvent-free for safe use.
- Rain and water ready in 12 hours, 100% waterproof – use for a variety of projects including windshields, headlights, hatches, attaching trim, cleats, accessories, and more
- 100% Silicone provides a flexible bond that won’t crack or shrink
- Product is not paintable, paint surfaces prior to applying
- Meets ASTM C920, Class 25
- Silicone rubber can be used for exterior and interior applications – adheres to common building materials such as glass, ceramic, porcelain, most metals and most plastics
Before you get started, it’s essential to gather all the tools and materials you’ll need for the project. Here’s a list of items you’ll likely require:
- Caulking gun
- Silicone caulk
- Weathertight sealant
- Putty knife or scraper
- Paintbrush or foam brush
- Rag or paper towels
- Window cleaner
- Tape measure
- Screwdriver
Make sure you have all these items on hand before you begin the sealing process.
Step 2: Clean the Area Around the Window Air Conditioner
Before you start sealing, it’s important to clean the area around your window air conditioner. Use a window cleaner and a rag or paper towels to remove any dirt, debris, or residue that may interfere with the sealing process.
Ensure that both the interior and exterior surfaces are clean and dry before proceeding to the next step.
Step 3: Inspect and Identify Gaps and Cracks
Thoroughly inspect the area around your window air conditioner to identify any gaps, cracks, or areas that require sealing. Common areas that may need attention include:
- The gap between the air conditioner and the window frame (applicable also for when installing window AC without drilling into window frame)
- Cracks or gaps in the caulking or sealant
- Spaces between the window frame and the wall
Take note of these areas, as they will be the focus of your sealing efforts.
Step 4: Remove Old Caulking or Sealant
If you find any old caulking or sealant that is cracked, deteriorated, or no longer effective, it’s important to remove it before applying new sealant. Use a putty knife or scraper to gently scrape away the old caulking, taking care not to damage the surrounding surfaces.
Ensure that the area is clean and free from any loose debris or residue.
Step 5: Apply New Sealant
Now it’s time to apply the new sealant. Load your caulking gun with a tube of silicone caulk or weathertight sealant, following the manufacturer’s instructions.
Starting from one corner, carefully apply a thin and even bead of sealant along the identified gaps and cracks. Use steady and consistent pressure to ensure proper coverage.
As you apply the sealant, use a paintbrush or foam brush to smooth and feather the edges, creating a seamless finish. This helps to blend the sealant with the surrounding surfaces and provides a professional appearance.
Step 6: Check for Proper Sealing
After applying the sealant, take a step back and inspect your work. Check for any missed areas or gaps that may require additional sealant.
You can also use your hand to feel for any drafts or air leaks around the window air conditioner. If you detect any, apply more sealant to those areas and smooth it out using your paintbrush or foam brush.
Step 7: Let the Sealant Cure
Once you’re satisfied with your sealing job, allow the sealant to cure according to the manufacturer’s instructions. This usually takes about 24 to 48 hours, but it’s essential to follow the recommended curing time to ensure proper adhesion and effectiveness.
Step 8: Test for Improved Efficiency
After the sealant has cured, it’s time to test your newly sealed window air conditioner for improved efficiency. Turn on your air conditioner and monitor its performance.
If you notice a significant reduction in drafts, air leaks, and noise, then you can rest assured that your sealing efforts have paid off.
It’s important to remember that regular maintenance and inspection are key to ensuring the longevity and effectiveness of your seal. Periodically check the sealant for any signs of cracking or deterioration, and reapply as necessary.
Sealing around a window air conditioner may seem like a small task, but its impact is significant. By preventing air leaks and drafts, improving energy efficiency, reducing energy costs, minimizing water damage, and creating a more comfortable living space, proper sealing can transform your cooling experience.
With the step-by-step guide provided in this article, you now have the knowledge and skills to seal your window air conditioner like a pro. So go ahead, take control of your comfort and energy savings, and enjoy a cool and efficient living space all summer long.
Portable Air Conditioners – Why you shouldn’t like them
Frequently Asked Questions (FAQ)
How do I seal around a window air conditioner?
What type of weatherstripping should I use?
Can I use duct tape to seal around the air conditioner?
How often should I check the seal around my window air conditioner?
Can I use caulk to seal around the air conditioner?
Conclusion: Importance and Steps for Sealing Around a Window Air Conditioner
In conclusion, sealing around a window air conditioner is crucial for several reasons. First, sealing prevents air leaks and drafts, ensuring an efficient cooling process and maintaining a comfortable indoor environment.
Second, it improves energy efficiency by reducing energy waste and lowering monthly utility bills. Third, sealing minimizes water damage caused by condensation buildup.
Fourth, it creates a more comfortable living space by reducing outside noise and maintaining a consistent indoor temperature. To effectively seal around a window air conditioner, follow these steps: 1. Gather the required tools and materials.
2. Clean the area around the air conditioner. 3.
